
Fitness influencer websites are branded destinations that bring coaching, workout content and business links together so visitors can choose their next step. This 2026 guide explains how to build a creator website for fitness influencers around your training niche, existing offers and a clear mobile experience.
TL;DR
- A creator website for fitness influencers should put coaching, workout content and business inquiries on clearly labeled paths.
- AkaMe fits fitness creators who want a custom domain and guided setup for a personalized creator website.
- Choose managed setup for convenience or direct website building for hands-on control.
- Keep your existing booking and subscription tools; make your website the place visitors find them.
Why a creator website matters for fitness influencers
A fitness audience has different reasons to visit your bio. Someone watching a technique demonstration wants the full workout. A prospective coaching client wants to understand your approach. A brand representative needs a business contact, not your training application.
AkaMe is a creator website builder for fitness influencers who want a personal domain with registration and publishing handled for them. AkaMe brings important destinations together on a customizable page rather than asking you to rebuild the services behind them.
For your 2026 website, separate those visitor intentions before choosing photos or button colors. A useful page tells people who you help, what you offer and where each link leads. It does not need to become a workout library, booking system and online store itself.
Fitness content also needs context. A lifting clip does not explain whether you coach beginners, experienced athletes or people training at home. Your website gives that explanation a stable place outside an individual post.
Build your fitness creator website in six steps
1. Choose one primary visitor action
Start with a document or a sheet of paper. Write down what you want a visitor to do after watching your content, then choose 1 primary action for the page. That number is a design constraint, not a limit on how many services you offer.
If coaching is your focus, lead with a coaching application. If your content supports an existing workout membership, lead with that destination. A creator building an educational audience can prioritize a workout library or newsletter instead.
Write the button label before designing anything. “Apply for strength coaching” sets a clearer expectation than “Start your journey.” The destination should fulfill that exact promise, rather than dropping visitors into another menu.
- Name the audience you actually serve.
- Choose the action that supports your current business focus.
- Write a button label that names its destination.
- Place secondary actions beneath the primary action.
- Remove links that no longer support an active offer.
2. Map your existing offers to clear destinations
Make a simple inventory of the tools and pages you already use. Open each destination yourself. Check what a new visitor sees, whether an account is required and whether the page explains the next step.
Group the links by visitor intent rather than by the order you created them. Coaching inquiries belong together. Educational content belongs together. Sponsorship inquiries deserve a separate route so a potential partner does not end up completing a client questionnaire.
A practical starting point is 3–5 destination links. Treat that as an editing exercise, not a product limit. If two links answer the same question, keep the clearer destination or explain the difference in their labels.
- Coaching: link to your existing application or booking destination.
- Workouts: link to the program or training library you maintain.
- Education: link to useful videos, articles or a newsletter.
- Business inquiries: link to your professional contact route.
- Subscriptions: link to the membership platform you already use.
3. Choose your domain and setup approach
The hands-on route is to select a domain, register it and configure it with your chosen website builder. This suits you when you want direct control over the building process and are comfortable managing the connection between the domain and the site.
The managed route combines those setup tasks. AkaMe’s link-in-bio website builder provides a personalized creator website on a unique domain, with registration and publishing handled for you. You can start your creator website and review a preview before checkout.
Choose a name that people can connect to your creator identity. Avoid tying the domain to a temporary training challenge unless that challenge is the entire business. For your 2026 launch, favor a name that still makes sense across your current coaching and content topics.
- Use a recognizable version of your creator name.
- Read the domain aloud to check its clarity.
- Avoid spelling that needs repeated explanation.
- Choose managed setup or direct configuration deliberately.
- Read registration and renewal terms before committing.
4. Select photos and write useful page copy
Begin by reviewing your existing photos manually. Choose an image that makes you recognizable and fits the training you actually discuss. A clear portrait or relevant training image gives visitors more context than an unrelated lifestyle shot.
Photo selection assistance can help narrow the choices, but the final choice stays yours. Review the crop and make sure the picture supports your message. Do not let a visually striking image imply a specialty, qualification or result you have not established.
Pair the image with a short explanation of your audience and offer. “Strength coaching for beginners training at home” is more informative than a list of motivational words. State qualifications accurately, and distinguish general educational content from individualized coaching.
- Choose a recognizable lead image.
- Check that important details survive a mobile crop.
- State who your training content helps.
- Describe the offer without promising physical outcomes.
- Include only qualifications you can substantiate.
5. Arrange the page around visitor intent
Sketch the page on paper before adjusting its layout. Put your identity and main offer first, followed by the primary action. Give supporting destinations enough context that visitors can choose without opening every link.
For a 2026 fitness creator website, the structure should reflect your actual business rather than a generic influencer template. A coach might prioritize applications; a workout educator might prioritize the training library. Neither needs to give business inquiries the same visual weight as the main audience action.
Use this simple hierarchy as your starting point. Each layer answers a different visitor question: who you are, what to do next, what else is useful and how to contact you professionally.
- Creator identity: name, image and training focus.
- Primary action: the most important destination.
- Supporting links: relevant workouts, education or subscriptions.
- Business contact: a separate professional inquiry route.
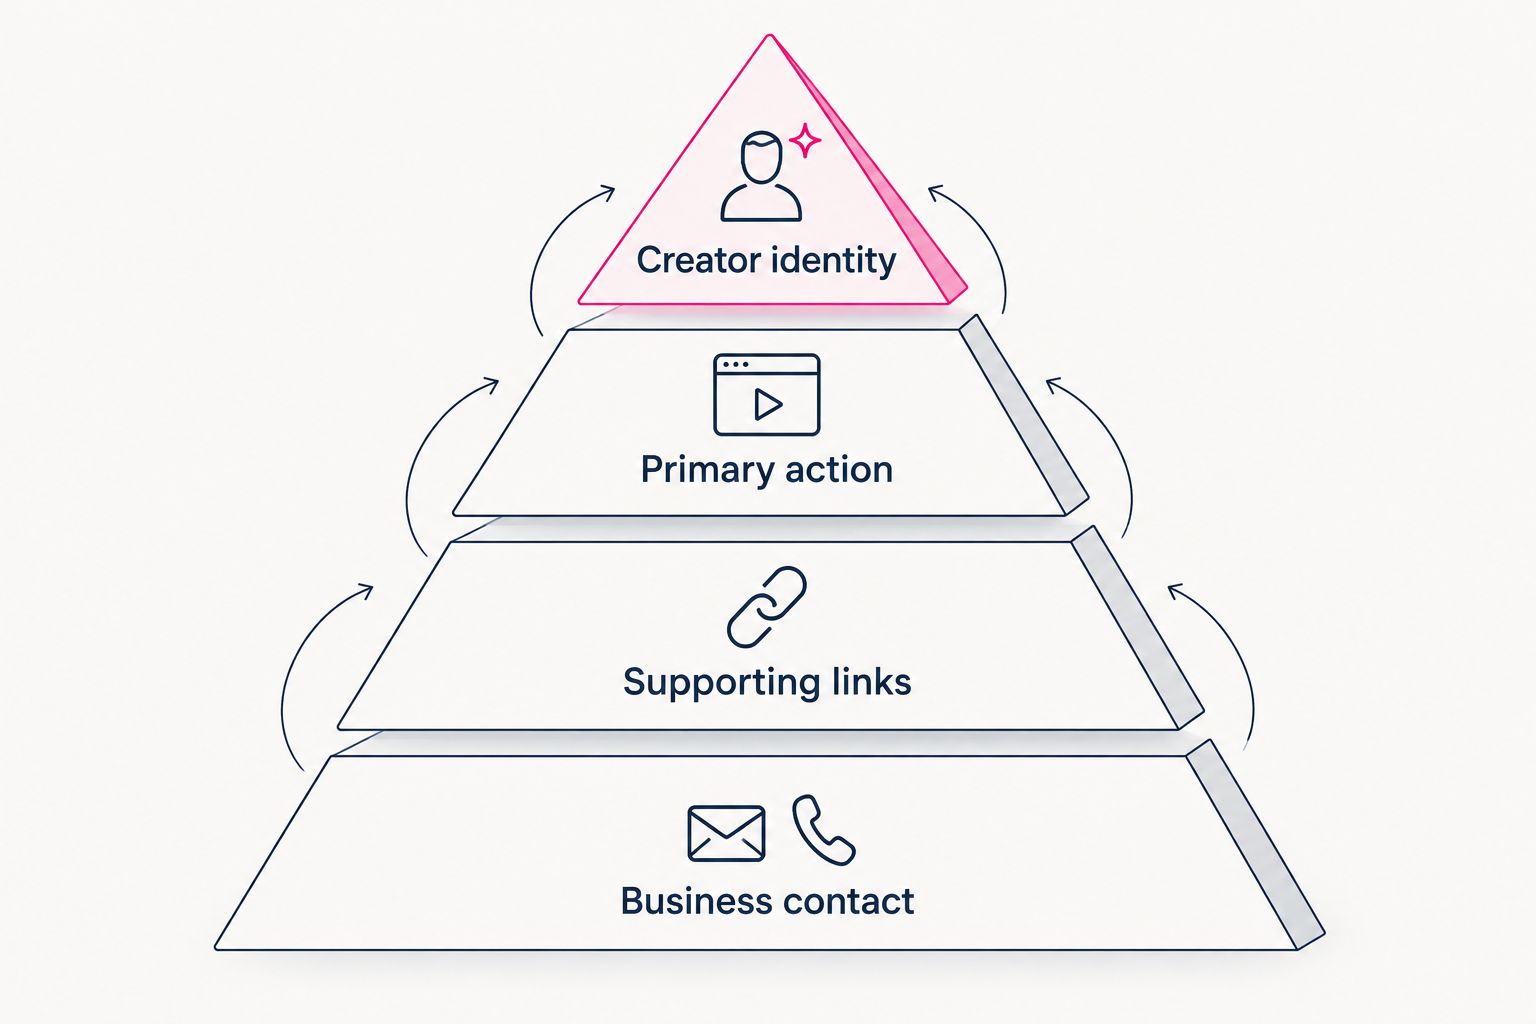
Give each part of the page a clear job before adjusting its appearance.
6. Test the complete journey before publishing
Open your preview and follow every route as a visitor. Do not stop at checking whether a button responds. Confirm that the destination is current, its purpose matches the label and the next step is understandable.
Check on 2 screen types: a phone and a desktop. This is a suggested testing routine, not a performance benchmark. On the phone, look for awkward image crops, long labels and important actions buried beneath less useful links.
After publishing, repeat the same journey from the social profile where visitors will actually begin. If your existing tools provide click or inquiry data, use those records alongside the page structure. A click shows interest in a destination; it does not establish a completed coaching booking.
- Open every link from the website preview.
- Compare each label with its destination.
- Review the page on a phone and desktop.
- Test the published link from your social profile.
- Recheck the page whenever an offer changes.
Choosing the right fit
Choose a website approach by the work you want to do yourself. Domain setup, page design and managing coaching services are separate jobs. Your website builder does not need to replace every tool in your business.
The options below represent different workflows, not a ranking based on unverified feature claims. Compare the current service details against your own requirements before choosing.
| Option | Best for | Practical strength | Key limitation or responsibility |
|---|---|---|---|
| AkaMe | Fitness creators wanting a personalized website and managed domain setup | Combines customization, registration, publishing and a preview before checkout | Designed to link to subscriptions, products or services you run elsewhere; assess those destination tools separately |
| Carrd | Creators who prefer direct control over website building and domain configuration | Suits a hands-on approach to creating a focused website | You take responsibility for the building and configuration choices |
| Linktree or Linkme | Creators evaluating a link-in-bio page workflow | Provides a familiar category of tools for bringing links together | Check each service’s current domain and customization options against your requirements |
| An existing website | Creators who already maintain a suitable branded destination | Lets you organize links within a site you already manage | You remain responsible for updating its layout, destinations and publishing setup |
Choose the workflow you want to maintain. If you enjoy building pages, direct control is useful. If you want a personalized destination without handling registration and publishing yourself, managed setup fits that priority.
For your 2026 comparison, use the same short brief for every option: your preferred domain, main visitor action, required destinations and desired level of design control. This keeps the decision tied to your business instead of a long feature list.
Common mistakes fitness influencers make
Sending every visitor to the same coaching form
A viewer looking for a workout demonstration is not necessarily ready to apply for coaching. Keep your main coaching action prominent, but give educational content and business inquiries distinct labels. That makes each route understandable without treating every visitor as a sales lead.
Naming buttons after internal program shorthand
An audience member might not know what your challenge nickname or coaching abbreviation means. Describe the destination in ordinary language. If the offer has an established name, add enough context to distinguish a workout program from an application or subscription.
Letting transformation images carry the whole message
Photos do not explain eligibility, coaching format or your training focus. Put those details into clear copy. Use images you have permission to publish, and avoid presenting an individual result as a promise to every prospective client.
Leaving old challenges and booking links live
A finished challenge or an outdated intake form creates a dead end even when the link technically works. Review the page when your offers change. Replace the destination or remove the button instead of leaving visitors to work out whether the offer is current.
FAQ
What should a creator website for fitness influencers include?
A creator website for fitness influencers should include a clear training focus, a recognizable image, a primary action and labeled links to current offers. Keep professional inquiries separate from coaching applications and educational content.
Can I keep my current coaching and booking tools?
Yes, you can link your creator website to the coaching and booking destinations you already use. The website organizes access to those tools rather than requiring you to replace them.
Is AkaMe a good fit for a fitness influencer?
AkaMe fits fitness influencers who want a personalized creator website on a unique domain with registration and publishing handled for them. It is designed to bring together links to subscriptions, products or services that live on other platforms.
Should I choose Carrd, Linktree or Linkme instead?
Choose according to how much website-building and domain-configuration work you want to handle. Carrd suits direct control; compare Linktree and Linkme against your specific link-page requirements and their current service details.
Do I need to host workout videos on my creator website?
No, your creator website can link to workouts hosted on the platforms you already use. Make the button label specific enough that visitors know whether they are opening a video, a library or a membership destination.
What should I check before publishing my fitness creator website?
Check every destination, the main action, image crops and the page on both a phone and desktop. Then test the published website from your social profile so you review the complete visitor journey.
Related guides
- Choose a custom domain or shared address
- Design your website around one main action
- Check your creator website before launch
One last thing
Test your page against the promise of your latest fitness post. If the post tells viewers to find a beginner workout through your bio, that workout should be easy to identify on arrival. A well-organized page can still miss the mark when its labels do not match your content.
Preview an AkaMe creator website, personalize it around your training focus and explore a domain that fits your name. Start with the visitor’s next step, then build the page around it.
Preview your fitness creator website
Personalize your page and explore a domain for your creator brand.